Austin
Round 17 of the FIA Formula 1 Championship takes place at Austin, Texas.
From its inaugural race in 2012, the Circuit of the Americas has proven to be an immensely popular Grand Prix. Over 110,000 people from across the Americas came to watch the magnificent show that is the United States Grand Prix.
From its inaugural race in 2012, the Circuit of the Americas has proven to be an immensely popular Grand Prix. Over 110,000 people from across the Americas came to watch the magnificent show that is the United States Grand Prix.
The circuit is mainly a concoction of the world’s most
thrilling and challenging corners. The features of Silverstone’s
Maggots/Becketts complex, Istanbul’s Turn 8 and Hockenheim’s arena complex are
all replicated in this circuit. The circuit also has its own unique touch with
the mountainous turn one.
There is much to talk about in this weekend's GP including: the drop out of Marussia and Caterham, Sebastian Vettel missing out on Qualifying and the Q1 chaos that is about to ensue.
There is much to talk about in this weekend's GP including: the drop out of Marussia and Caterham, Sebastian Vettel missing out on Qualifying and the Q1 chaos that is about to ensue.
Aero Characteristics of Circuit

Sector One begins with a replica Sao Paulo ‘Senna S’ before
leading into a Silverstone ‘Maggots Becketts’ complex. Both sets of corners
require high downforce to achieve satisfactory change in direction abilities. Due
to the high speed nature of this section, a medium/low downforce package will
suffice in providing suitable levels of DF. This is where an F1 car works hard
and it must not be sluggish or lazy around here; otherwise the whole lap will perish.
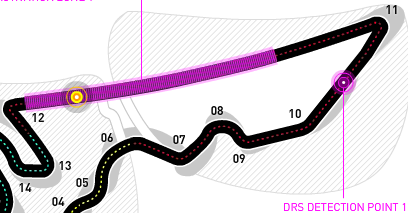
Sector Two progresses into a series of fast, tight and
aggressive corners, T7, 8 & 9. T11 marks the start of a 1 kilometre DRS
straight where we will see the majority of overtakes.
The nature of Sector One
and the first half of Sector Two induces single file racing, and therefore, not
much overtaking. The run down to the T11 hairpin will most likely see a good
few lunges as people chase each other all the way down from T1.
 After the 90 left-hander at the end of the straight, Sector Three begins. The
Sector flows straight into a Hockenheim-like arena complex of corners, narrow,
fast and very demanding. Medium speed therefore a medium downforce package is
required through here. Sector Three also harbours the Istanbul turn 8 copy-cat,
which will be demanding max downforce.
After the 90 left-hander at the end of the straight, Sector Three begins. The
Sector flows straight into a Hockenheim-like arena complex of corners, narrow,
fast and very demanding. Medium speed therefore a medium downforce package is
required through here. Sector Three also harbours the Istanbul turn 8 copy-cat,
which will be demanding max downforce.
There are some large compromises needed to be made as usual.
Sector One doesn’t demand too much downforce whereas some corners such as the
Istanbul replica do… It’s worth noting that the 1km DRS straight could well
solve this problem without any questions, because nobody wants to be the
sitting duck with high drag & downforce.
Tyres & Strategy (Wear, options)
Prime – Medium (WHITE)
Option – Soft (YELLOW)
Option – Soft (YELLOW)
Tyre wear rates at COTA are low, hence Pirelli nominating a
relaxed soft & medium combination.
In 2013, the grid ran a one stop race with a one up compound
selection (Medium and Hard). After the recent Russian GP, I can’t imagine anyone
ever wanting to see a one stop race again.
Dropping the nominated tyres into softer choices means that degradation will increase, thus taking the race out of a one stop race and into a two stop. This is the first time the COTA will see a two stop GP which means that the Engineers have no experience in a two stop strategy around here.
Dropping the nominated tyres into softer choices means that degradation will increase, thus taking the race out of a one stop race and into a two stop. This is the first time the COTA will see a two stop GP which means that the Engineers have no experience in a two stop strategy around here.
So far this season Daniel Ricciardo has taken two of his
three wins during a soft/medium race. If there is any major scuffling up front
between the two Mercedes cars, then be sure to keep an eye out on the Honey
Badger.
Mechanical Set Up
Sector One and the beginning of Sector Two are extremely
demanding on the car. Superb change in direction abilities are required as
lateral stability are key.
A low roll centre is one of the things which will be required
for a quick Sector One. A low roll centre will ensure that the car is stiff and
responsive for the harsh direction changes.
The nature of these first few corners means that the tyres
will not be subjected to a long enough time period under lateral stress. If the
suspension is set up too stiff, then the tyres will not be able get into a
sufficient operating window as the tyres are unable to bite into the circuit. The
car will struggle to laterally transfer weight and it’ll be slow through S1.
Aerodynamics provides the majority of ‘grip’ for Sector One,
thanks its high speeds.
Sector Three’s ‘Hockenheim Arena’ demands high levels of
mechanical grip. It’ll be interesting to see which team has a high performing
chassis through this sector.
Consistent and high levels of medium speed grip will be required, 50% from the
aero and 50% from the mechanical set up.
COTA demands many compromises because of the variety of
corners. It is a circuit for and overall well balanced car.
Thanks for reading. Please keep an eye out for ‘United
States – Race Engineer’s Quali Notes’ on Saturday night, UK time.


