Friday, 13 March 2015

Australian GP - Race Engineer's Notes


Albert Park – Laps: 58

2014 Pole Time: HAM – 1:44.231s (Wet)
2014 Winner: ROS – 1:32:58.710 (57 Laps)


Round 1 of the 2015 FIA Formula 1 season kicks off in Melbourne, Australia.

Part public road – part racing circuit, Albert Park’s varying nature makes driving and engineering no straightforward task.
Due to the circuit consisting mainly of public roads, the average corner speed is relatively low for a Formula 1 car.
This places less emphasis on the aerodynamic performance of the car, and more emphasis on mechanical set up.


Aero Characteristics of Circuit 

Along with the usual DRS zone on the Pit Straight, there is a second zone on the rundown to turn three. Providing that somebody makes a slightly messy overtake when diving into turn one, the trailing driver should be able to maintain a cleaner line through the chicane, and therefore be able to use the second DRS straight to regain the lost position.
This means that overtakes into turn one must be perfect to avoid handing the place back to the opponent.


Sector Two introduces itself with a deceiving Turn 6. The entry of this corner allows you to bring lots of speed in, but the exit quickly converges and turns into the left hander of Turn 7. An optimised aero balance is key to keeping the car laterally stable though this area of rapid direction change.


Sector Three starts with Turns 11 and 12, probably the two fastest corners on the circuit. Because they’re laterally harsh on the car, maximum downforce would be desired to achieve an optimum apex speeds.

The final corners up to the Start/Finish straight are all relatively slow speed where downforce doesn’t provide the majority of the performance. This is a characteristic that all street circuits share.


High downforce packages will be used in Melbourne thanks to the tight, sharp corners. It is a necessity to extract as much downforce as possible on a street circuit. The extra drag this induces is also a necessary compromise.

Tyres & Strategy
Prime – Soft (YELLOW)
Option – Mediums (WHITE)
Tyre wear at in Melbourne is average, hence Pirelli occupying the middle ground with the Soft and Medium compounds.

Last year, the Pirelli’s were generally quite lenient with degradation. I can’t suggest anything as to how the 2015 tyres will degrade/behave, but it’ll be interesting to keep an eye on to compare them to last year's Aussie GP


Mechanical Set Up
The slow speed corners are almost all very sharp 90 degree bends. This leads to ‘point and squirt’ driving with the throttle and steering wheel.
It is crucial that the engineers can set up the car for maximum stability so that the power can be put down as effectively as possible without tearing the rear tyres up.
The extra low roll centres that are induced by the new suspension geometries probably won’t be so much of a problem as I initially expected.

Providing that the Anti-Roll devices loosen the car up enough, then the tyres will be able to create more friction thanks to the lateral weight transfer/roll. As usual, a compromise has to be made between sliding due to stiffness or rolling due to 

Saturday, 31 January 2015

Scuderia Ferrari SF15-T Suspension Analysis


SF15-T                              F14-T


Within the past year or two, the FIA have forced teams into lowering their cars’ noses as a measure of safety. The lowering of the nose is a process that starts from the monocoque and front bulkhead, this means that it also (indirectly) affects the front suspension. This blog analyses Ferrari’s major front suspension redesign.

Mechanical

Ferrari retain their pull rod system (yellow) that they’ve been using at the front for the past few years. Although it provides a lower Centre of Gravity, it has the potential to damage the airflow around the side-pods and rear of the car. Ferrari must have serious faith in this system, because stark contrast, the majority of the grid use the opposite push rod system.

Most of the teams on the grid decided to completely redesign their front suspensions last year for their 2014 cars, when the front bulkhead height was reduced considerably. Geometries had to be changed to maintain optimum handling of the front end.
I believe Ferrari aimed to keep the F14-T chassis as high as possible at its leading edge, creating the steep wishbone angles. Using Mercedes as a benchmark, Ferrari went the wrong way in trying to 
keep the nose as high as possible.

The new geometry layout creates a much lower roll centre; this allows the mass of the car to roll about this point a lot more than last year. The soft front end that this induces is undesired as it varies the ride height during cornering, significantly interfering with diffuser flow.

Effectively, Ferrari could be a year behind on the understanding and development of this new geometry.


Last year, every Constructor from Mercedes to Marussia struggled with the suspension changes caused by having a lower roll centre. For example, last year, we saw most twitches occurring during medium speed corners, or where rapid changes in direction were required. Downforce wasn’t providing the majority of the grip in these examples. Mechanical capabilities are crucial in this modern Formula, where the FIA try to reduce levels of downforce.

Aero

From the side by side comparison, the overall organisation and tidiness of the SF14-T has improved from last year. This will aid in keeping the air flow as predictable as possible so as not to disturb the rear air flow of the car.

The F14-T's steep wishbones came about by Ferrari aiming to keep the chassis as high as possible to maximise airflow through the diffuser. In hindsight, it was probably better to have a low chassis & nose so that the rear of the car could be optimised. (Easy for me to say) 

I’m not convinced that the compromise for a lower CoG is more beneficial than having cleaner airflow through the suspension elements. Surely, aerodynamics is more of an important factor in performance rather than reducing the CoG due to the placement of two small torsion-bar/dampening kits. 

Saturday, 8 November 2014

Brasil - Race Engineers Notes Part 2

FP2 Analysis

 Sector 1


In order of final FP2 position, I have created a graph showing each of the top ten drivers’ Sector 1 times.

Before I go on to analyse, I will quickly mention my earlier prediction of what would happen during Sector 1:
·                             Williams would be the closest match to the Mercedes’ - Due to: good medium speed aerodynamics and for having the same PU for the end of S1 straight.         


Whilst Rosberg finished fastest with Hamilton right behind, Massa gave both Mercedes drivers a run for their money as he pushed hard through S1. Less than half a tenth split him from Hamilton which is an impressive fact. Williams’ average S1 time is 2nd best in the field, highlighting the FW-36’s delicate balance between aerodynamics and mechanical set up.

Ferrari came close to matching Red Bull on average which is surprising considering how inefficient their aerodynamics are.
As this sector demands both mechanical and aero capabilities, I would’ve thought that Ferrari could make up for their aero deficit through S1, but it was not the case.

Kvyat had another magnificent Sector as he continues to demonstrate why he got next year’s RB seat. Fourth fastest, ahead of Ferrari, Red Bull and McLaren, is something special. Again, this proves that the Toro Rosso has a good balance between mechanical and aero set up.


Sector 2 


The data above can be used to show the teams’ aerodynamic efficiencies. If you’re quick through here then it help show how good your medium speed aero is.
On average, Ferrari are second quickest which shows how much better their medium speed aero is compared to their usual high speed aero. It could be that Ferrari are running more downforce to help increase laptime whilst compromising their S1 and S3.

In stark comparison to S1, Massa becomes second slowest in S2. Massa has never taken a liking to tight twisty circuits (like Monaco), and Interlagos’ S2 replicates a street circuit quite well. It would be inaccurate to say that the Williams struggles here because Bottas goes over 1.5 tenths faster than his team-mate.  


Sector 3

Pace through S3 is pretty much completely dependent upon straight line capabilities - that is max velocity and acceleration.


Massa once again pulled out the home advantage, even beating Hamilton, and doing it quite comfortably. The Williams is quick, their theoretical best lap time could easily challenge for the front row in Qualifying.

Ferrari don’t seem to have been punished at all by their good speed through S2. The F14-T suits Interlagos quite nicely.

Ricciardo and Vettel continue to struggle with their Renault PU. The pit straight will be very detrimental to them in the race.


Qualifying

Qualifying in Brasil will be very tricky this weekend. The field is incredibly competitive at the top between Ferrari, Mercedes and Williams. The weather will also play a significant role in determining the grid as teams like Williams will struggle with low grip conditions.

Car set up will be crucial because if it is dry in qualifying, teams may have to compromise set up so that they will remain competitive in a wet race on Sunday Quali in Sao Paulo will be a thrilling event that will be very intriguing to analyse.

Thanks for reading!

Ali

Friday, 7 November 2014

Brasil - Race Engineers's Notes

Interlagos and its challenges

Round 17 of the FIA Formula 1 Championship takes us to Sao Paulo, Brasil.

This old school circuit is Formula 1 jewel. Its similarities to a gritty karting track are quite striking, which is probably why most drivers adore this circuit. History has witnessed some iconic moments at this special place such as: Senna’s heroic first win at home in ’91 and Hamilton’s ’08 final corner Championship winner.

There is only one ‘real’ straight with the rest of the circuit comprising of curves and corners, all of which vary in magnitude. 

The circuit has been renovated for 2014 with a new pit lane entrance, and more importantly with a new resurfacing. Pirelli also re-nominated their tyres to help ensure suitable degradation throughout the race.

Aero Characteristics of Circuit


Sector One starts with the Senna S curve, where the tricky turn in phase may claim more victims than usual because of the new, smooth tarmac. Turn three will demand medium downforce as the cars fight to stay on line after being initially disturbed by the tough Senna S.
The following (and only true) straight of the circuit follows, where Sector 1 ends at the braking zone. This DRS straight is the first real opportunity to overtake after the lunging opportunity back at T1.


Sector Two progresses into a series of highly challenging tight corners. Entry speeds are tremendous considering how constrictive and street like the corners are. Once again, high downforce levels are required to keep the cars stable as they enter S2’s corners.
The curvaceous nature of this circuit means that the car is under lateral loads during the braking phase (Such as T8 and T10). This results in increased levels of instability, which manifests itself in lots of oversteer spins.


Sector Three starts at T12, the one corner of this sector which requires braking. T13/14/15 are basically all on the pit straight and don’t require any input changes except for steering. It is no doubt that they’ll be flat out, even without the blown diffusers.


Sector Two is the dominating sector of this circuit and therefore the car needs to be set up to be quickest around here. The corners at Sao Paolo aren’t particularly high speed and therefore a very high downforce spec is not especially required. Any excess downforce will not result in quicker cornering speeds but they will result in enhanced drag levels on the straights.


Tyres & Strategy (Wear, options)


Prime – Medium (WHITE)
Option – Soft (YELLOW)

Interlagos’ recent resurfacing will reduce degradation massively. Just as in Sochi, the tarmac will not yet have had chance to expose its ‘base’ layer, this means that the tyres will not have anything abrasive enough to cause substantial degradation. We will have to see over the weekend whether Pirelli nominated a suitable pair of tyres.
It is a little bit of an unknown to the engineers as to how the tyres will behave, but it is nothing that can’t be realised from the practice sessions.

As I mentioned last week, two of Ricciardo’s wins have been on a soft/medium combination and it would be worth keeping an eye on him! Ricciardo comfortably secured the final podium position which confirmed my predictions.


Mechanical Set Up

Sector two is the main decider at Interlagos. Stability is key as the circuit induces heavy instabilities especially at corner entry.

A higher than usual roll centre is most likely required to allow the cars to absorb any lateral instabilities which will help the car bite and roll at turn in.

It is worth noting that a stiff setup will be extremely poor when combined with the resurfacing. Four wheel sliding and endless levels of oversteer will ensue with a stiff chassis and suspension.

Interlagos requires a very good chassis design because it relies upon mechanical set up quite heavily. The m


edium speeds of the circuit means that the cars can’t generate the highest levels of downforce, this means that the cars have to extract grip from somewhere else, the mechanical set up.


Thanks for reading, I hope you enjoyed it! (Apologies for it being late)

Ali

Wednesday, 29 October 2014

United States GP - Race Engineers Notes

Austin


Round 17 of the FIA Formula 1 Championship takes place at Austin, Texas.

From its inaugural race in 2012, the Circuit of the Americas has proven to be an immensely popular Grand Prix. Over 110,000 people from across the Americas came to watch the magnificent show that is the United States Grand Prix.

The circuit is mainly a concoction of the world’s most thrilling and challenging corners. The features of Silverstone’s Maggots/Becketts complex, Istanbul’s Turn 8 and Hockenheim’s arena complex are all replicated in this circuit. The circuit also has its own unique touch with the mountainous turn one.

There is much to talk about in this weekend's GP including: the drop out of Marussia and Caterham, Sebastian Vettel missing out on Qualifying and the Q1 chaos that is about to ensue.


Aero Characteristics of Circuit


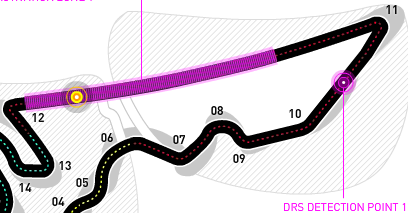
Sector One begins with a replica Sao Paulo ‘Senna S’ before leading into a Silverstone ‘Maggots Becketts’ complex. Both sets of corners require high downforce to achieve satisfactory change in direction abilities. Due to the high speed nature of this section, a medium/low downforce package will suffice in providing suitable levels of DF. This is where an F1 car works hard and it must not be sluggish or lazy around here; otherwise the whole lap will perish.


Sector Two progresses into a series of fast, tight and aggressive corners, T7, 8 & 9. T11 marks the start of a 1 kilometre DRS straight where we will see the majority of overtakes. 

The nature of Sector One and the first half of Sector Two induces single file racing, and therefore, not much overtaking. The run down to the T11 hairpin will most likely see a good few lunges as people chase each other all the way down from T1.


After the 90 left-hander at the end of the straight, Sector Three begins. The Sector flows straight into a Hockenheim-like arena complex of corners, narrow, fast and very demanding. Medium speed therefore a medium downforce package is required through here. Sector Three also harbours the Istanbul turn 8 copy-cat, which will be demanding max downforce.


There are some large compromises needed to be made as usual. Sector One doesn’t demand too much downforce whereas some corners such as the Istanbul replica do… It’s worth noting that the 1km DRS straight could well solve this problem without any questions, because nobody wants to be the sitting duck with high drag & downforce.


Tyres & Strategy (Wear, options)


Prime – Medium (WHITE)
Option – Soft (YELLOW)
Tyre wear rates at COTA are low, hence Pirelli nominating a relaxed soft & medium combination.

In 2013, the grid ran a one stop race with a one up compound selection (Medium and Hard). After the recent Russian GP, I can’t imagine anyone ever wanting to see a one stop race again.
Dropping the nominated tyres into softer choices means that degradation will increase, thus taking the race out of a one stop race and into a two stop. This is the first time the COTA will see a two stop GP which means that the Engineers have no experience in a two stop strategy around here.

So far this season Daniel Ricciardo has taken two of his three wins during a soft/medium race. If there is any major scuffling up front between the two Mercedes cars, then be sure to keep an eye out on the Honey Badger.

Mechanical Set Up

Sector One and the beginning of Sector Two are extremely demanding on the car. Superb change in direction abilities are required as lateral stability are key.
A low roll centre is one of the things which will be required for a quick Sector One. A low roll centre will ensure that the car is stiff and responsive for the harsh direction changes.
The nature of these first few corners means that the tyres will not be subjected to a long enough time period under lateral stress. If the suspension is set up too stiff, then the tyres will not be able get into a sufficient operating window as the tyres are unable to bite into the circuit. The car will struggle to laterally transfer weight and it’ll be slow through S1.

Aerodynamics provides the majority of ‘grip’ for Sector One, thanks its high speeds.
Sector Three’s ‘Hockenheim Arena’ demands high levels of mechanical grip. It’ll be interesting to see which team has a high performing chassis through this sector. 
Consistent and high levels of medium speed grip will be required, 50% from the aero and 50% from the mechanical set up.

COTA demands many compromises because of the variety of corners. It is a circuit for and overall well balanced car.


Thanks for reading. Please keep an eye out for ‘United States – Race Engineer’s Quali Notes’ on Saturday night, UK time.

Friday, 3 October 2014

Race Engineer’s Notebook – Japan – Part 2


In today’s Part 2 (of three), I’ll be jumping straight into FP2 analysis. In order to keep the blog short but as informative as possible, I will skip analysing FP1 because usually that is the session where teams are still gauging the circuit and conditions, and therefore the FP1 times do not reliably tell us anything regarding overall pace.


FP2 Analysis


 Sector 1


In order of final FP2 position, I have created a graph showing each of the top ten drivers’ Sector 1 times.

Before I go on to analyse, I will quickly mention my earlier predictions of what would happen during Sector 1:
  •         Red Bulls would be the closest match to the Mercedes’
  •          Ferraris to have similar times to the Williams’


Everyone knows the strengths of the Newey designed RB, and that is high speed cornering. I for one thought that the Red Bull cars would be extremely quick through here because the nature of Sector 1 is purely high speed cornering.
In fact the RB’s were the fourth quickest constructor behind Mercedes, Williams, McLaren and Toro Rosso.
The RB’s seem to be struggling through this sector, which could be down to the deteriorating circuit conditions.

The high aero demands of Sector 1 also highlight Ferrari’s poor aerodynamic efficiency compared to their competitors. Ignoring Ricciardo because of him missing the majority of the session, the two Ferraris were the slowest through S1 in the top 10.
This data helps prove how much of an aerodynamic deficit Ferrari has. Ferrari’s main competitor, Williams, were around 3.5 tenths quicker through this sector alone, which simply cannot be put down to Williams having a Mercedes PU.

McLaren have shown good strength in their aerodynamics and their cars’ agility with K-Mag scoring a fantastic 34.800s. Button finished FP2 4th overall, but if he could match Magnussen’s 2 tenth superiority through S1, Button could well find himself just as quick as the Williams (if not quicker!).
Kvyat ended up 4th quickest through S1 highlighting the potential in himself and the Toro Rosso - A very impressive Sector indeed.


Sector 2 

In FP2 positions 3rd-8th (BOT-MAG), the drivers were separated by just over 0.2 seconds. This goes to show how tight the competition is immediately behind the Mercedes’.


To begin with, we will look at the slowest person through S2. Kvyat, who was one of the quickest in S1, has now lost a significant amount of time compared to the rest of the top 10. The Toro Rosso is likely struggling with maximising its mechanical grip, as the cars go from T8 and T9 down towards the hairpin.
The final challenge of S2 is the Spoon Curve, which the TR should be able to handle comfortably. As proven in S1, the Toro Rosso is more than capable with high speed cornering.

Ferrari are faster than McLaren in general, which is surprising because I’d expected S2 to be more of an ‘PU Sector’. Obviously McLaren’s Mercedes HPP isn’t going above and beyond for sector two, as Ferrari seem to have their Mechanical Grip and power delivery nailed. RAI, VET and BOT post almost identical Sector 2 times. The Ferrari (Raikkonen) is quick.

In opposite fashion to S1, Button is just under a tenth quicker than Magnussen, but overall, Magnussen is still quicker going into S3.


Sector 3

Sector 3 was dominated by Lewis as he well and truly went HAM.
Alonso is ridiculously quick through here, but we all know how good he is through 130R, so the rest of his S3 is a piece of cake.


Hamilton blew Nico away by almost 2.5 tenths in S3. Considering S3 consists only of a chicane and 130R, you must be quite special to put this sort of delta in between you and your team-mate.
Nico was shockingly slow finishing 5th fastest in this sector, with no offence meant, but even Button’s Mac was quicker. Maybe he is struggling with braking into the chicane, maybe he’s lifting too much through 130R, who knows? I’d expect Mercedes to correct this issue by qualifying; otherwise we could potentially see another coloured car on the front row.

Alonso has always been quick through this Sector, as he secures 2nd fastest – very impressive considering the recent performances of the Ferrari against the Red Bulls etc.

Bottas shows how good the Williams’ aerodynamics and stability are as he gets 3rd fastest. He’s a gutsy driver and this sector suits him.

Qualifying

Qualifying in Japan will be an extremely difficult task for every car in the pit lane. Uncertainty with the weather, and intense competition throughout the field could easily cause a two team front row.

Alonso is continually doing things that nobody believes can be done in the F14T, and partnerships like Bottas and Williams prove extremely hungry to fight for a fight between themselves and the Mercedes. It can’t be forgotten that Williams and Ferrari are in a very close battle for 3rd place in the WCC. So far in Japan, even though Bottas is superior to the two Ferraris, Massa is struggling to break into the top ten, and therefore, the Ferrari’s have more of a chance to score more points.

The field is incredibly tight this weekend in Japan, and the slightest of mistakes could see a Q3 lap go from 2nd on the grid to 8th. The stakes are higher than ever, and with a possibility of an early red flag during Sunday’s race, it makes grid position that much more important.


Monday, 29 September 2014

Japan - Race Engineer's Notes

Suzuka and its Challenges

Round 15 of the FIA Formula 1 Championship takes us to Suzuka Japan, ‘The Land of The Rising Sun’.

Incredibly popular with most of the World’s greatest drivers, Suzuka provides a monumental challenge for both drivers and engineers. The 5.8km circuit has many blind corners due to its spectacular escalation changes, where judging your entry and exit points can be very difficult in an F1 car.

The contrast in each of the three sectors provides a big challenge in setting the up the cars, as considerable compromises have to be made.


Aero Characteristics of Circuit 

Sector One consists of the infamous ‘S Curves’, a series of five magnificent quick left right corners. The S curves demand high downforce for a car to be stable through this turbulent sector, quite the opposite of the other two sectors.


Sector Two begins as the cars enter turn 8, the Degner curve. The cars approach at 280km/h before a quick dab on the brakes and into the tight consecutive right handers of T8 & T9. The circuit opens up from here, which demands little downforce and less drag as the sector ends at the 130R turn in.


Sector Three begins just before the terrifying 130R corner. I believe that the cars will have more than enough downforce at these speeds to get round flat out (Even with a low downforce package). As with Sector Two, Sector Three mainly requires low downforce as there is so much time to be made with a higher straight line velocity (Rather than higher velocity through the corners).


As you can see S1 demands a lot of downforce, yet the other two sectors are suited for top speed. A medium downforce package will be most suitable for Suzuka.


Tyres & Strategy

Prime – Hard (ORANGE)
Option – Mediums (WHITE)
Tyre wear rates at Suzuka are quite high, hence Pirelli nominating the two hardest compounds for the weekend.


In 2013, the majority of the grid ran a two stop race with the same compound selection. Starting on the Option before two Prime stops was the typical strategy.


In 2014 I would like to see a few drivers attempting to push the medium tyres a bit longer, so that they can run a one stop and take the hards all the way to the end. The 2014 Pirelli’s are quite lenient when you run a less aggressive car set up, and as we saw in Singapore, it could be possible to push for a one stop… Even if it does require a bit of “Grandma” driving…
The average strategy looks like it will be a two stop race again.


Mechanical Set Up

The continuous high speed direction changing in Sector One requires a very stable and predictable car. Being able to stay on the optimum racing line is critically important through this sector, because as soon as you go off line for one of the S curves, you will be punished all the way up until mid-way through sector 2.


A low roll centre, precisely set up anti-roll bar and cambered tyres are some of the things which will be required for a quick Sector One.

A low roll centre will ensure that the car is stiff and responsive for the harsh direction changes. It is important to mention that too low of a roll centre can cause the car to become too ‘stiff’ and could therefore cause major problems in getting tyres up to operating temperatures. A stiff chassis causes minimal roll and therefore makes the car slide around much more as the tyres can’t bite into the tarmac.

The anti-roll bar settings are crucial in making sure that there is maximum lateral stability. Too much roll will cause poor change in direction abilities and too stiff will cause sliding.


As the cars go through the S curves and 130R, they will be subjected to around 3-4G’s of lateral force. This induces a large amount of rolling torque, and it is very important that the tyres maintain maximum surface area in contact with the ground, which is why cambers will have to be carefully calculated.


Thanks for reading. Please keep an eye out for ‘Japan – Race Engineer’s Quali Notes’ on Friday night, UK time (BST).


Thursday, 4 September 2014

Ruthless World Champions

Ruthless World Champions


Throughout the recent decades of F1 we have seen a handful of truly gifted world champions with something quite distinct in common. I am not talking about race craft skills or overtaking abilities, but I am talking about sheer ruthlessness.  Many of us (including myself) may not want to accept this, but it is a fact.
Each World Champion I’m about to discuss has 100% deliberately committed a gravely unethical action on the race track, that secured them a World title.
I’m going to show you a few infamous examples in chronological order, starting from the 1989 Formula 1 season. 

Will Nico Rosberg’s Spa incident seal his first WDC? History is on his side.


Prost – Suzuka 1989 - Wins title

On lap 47 of the Japanese GP 1989, Senna makes a very brave lunge into Suzuka’s end of lap chicane, to try and overtake Prost for the lead.
Senna gets his car side by side successfully, yet Prost turns in 5-10m early and into the side of Senna, deliberately causing an accident in which was probably an attempt on forcing Senna to retire.
Although Prost’s plan didn’t initially work (as Senna continued on to win the race), Senna was eventually, and unfairly disqualified from the race as he’d used the chicane cut through to restart his stalled McLaren.
This disqualification sealed the 1989 WDC for Prost.
Deliberate crash:
·         Prost turns in 5-10m early
·         Prost aware of Sennas presence for 6+ laps
·         A cheeky final check in Prost’s mirror confirms that he can successfully crash into Senna


Senna – Suzuka 1990 - Wins title

One whole year later at Suzuka, Senna qualifies on pole position with Prost by his side. For some strange reason, the FIA decided that the pole sitter will start on the unused and ‘dirty’ side of the circuit, giving Senna an immediate disadvantage off the line.
Running down to T1, Senna deliberately ploughs into Prost’s rear right tyre to, almost, ‘prove a point’. He won Pole, therefore he should have the advantage of being 1st into T1, but he wasn’t and therefore decided to crash into Prost to force him to retire.
This action confirmed the 1990 WDC for Senna.

Deliberate crash:
·         Significantly behind going into T1 but Senna makes no effort to decelerate
·         Revenge for the previous year??


Schumacher – 1994 Adelaide - Wins title

Midway through the 1994 Austrailian GP, Damon Hill makes an attempt on Schumacher for P1. As with the previous scenarios, Schumi knows that if his opponent fails to score points, then he will be guaranteed the WDC.
As Hill catches Schumacher at a rapid pace, Schumacher’s inexperience causes him to lose focus and he begins to run wide at corners, losing even more time to Hill. Hill goes for the inside, successfully getting side-by-side (again – like the Senna Prost examples). Schumacher takes his normal line, sees Hill in his peripheral and then reacts to straighten the car to avoid contact. A split second later he turns into the corner again, causing contact between the two cars which subsequently causes Hill to retire with suspension damage.
Yet again, this confirmed the WDC for the driver causing the collision.
Deliberate crash:
·         Hill successfully gets side-by-side with Schumi, yet Schumi still turns in
·         Schumi straightens the wheel up when Hill gets into his peripheral vision, then decides to have a second hack, straight into Hill.


Vettel – Malaysia 2013 - Wins title

Thankfully, Vettel’s ruthlessness came from blatantly disobeying team orders – Multi 21. The majority of F1 watchers were disgusted with his actions, but Vettel did what he had to do for those extra few points.


Rosberg – Spa 2014 - Wins title?

Finally, we can look at the most detestable of examples as one of our British drivers was unfairly ejected from the Belgian GP’s final classification, and worst of all, pretty much destroying his chances of a second WDC.

From my own personal racing experiences, and from watching a good few years of F1, it is vivid to see how deliberate Rosberg’s actions are at Le Combe.

At every other occasion where a drivers front wing is at risk of being swiped off, they will instantly step on the brakes, even for a tenth of a second, no matter if he has to concede defeat for that opportunity. 
Rosberg can see that Hamilton is on a defensive line, and will therefore be pushed deep into the corner, tightening his left turn of Le Combe, yet Rosberg still keeps his nose in the area where Physics will push Hamilton’s car. There is 0% chance of an overtake occurring into the left hander when the driver ahead has around a car’s length advantage on track. Vettel experienced that the lap before and successfully aborted because he knew he’d be punished by the stewards.

Could this delicate, yet deliberate act seize the 2014 WDC for Rosberg?


The actions of these talented and highly praised drivers have all helped them become greats of World Sport. There is no doubt that some of the things they have done have been shameless, but it goes to show how ruthless this breed of people are. The lengths that they will go to, to be successful, is beyond belief. They were/are willing to risk other peoples’ lives, for their own success.  


I just want you to have a think about how 'legendary' these drivers are. How and why are they uncomprehendingly hellbent on success?